


If you want to get access to your Spotify listing habit through an invoice then you can use Receiptify. It is a third party website that provides statistics on your streaming music activity by allowing you to check your top streamed tunes across three periods: all lifetime, the past 6 months, and the month before. This article will walk you through the process and how you may use it to generate an invoicing for yourself.
What is a Spotify Receipt?
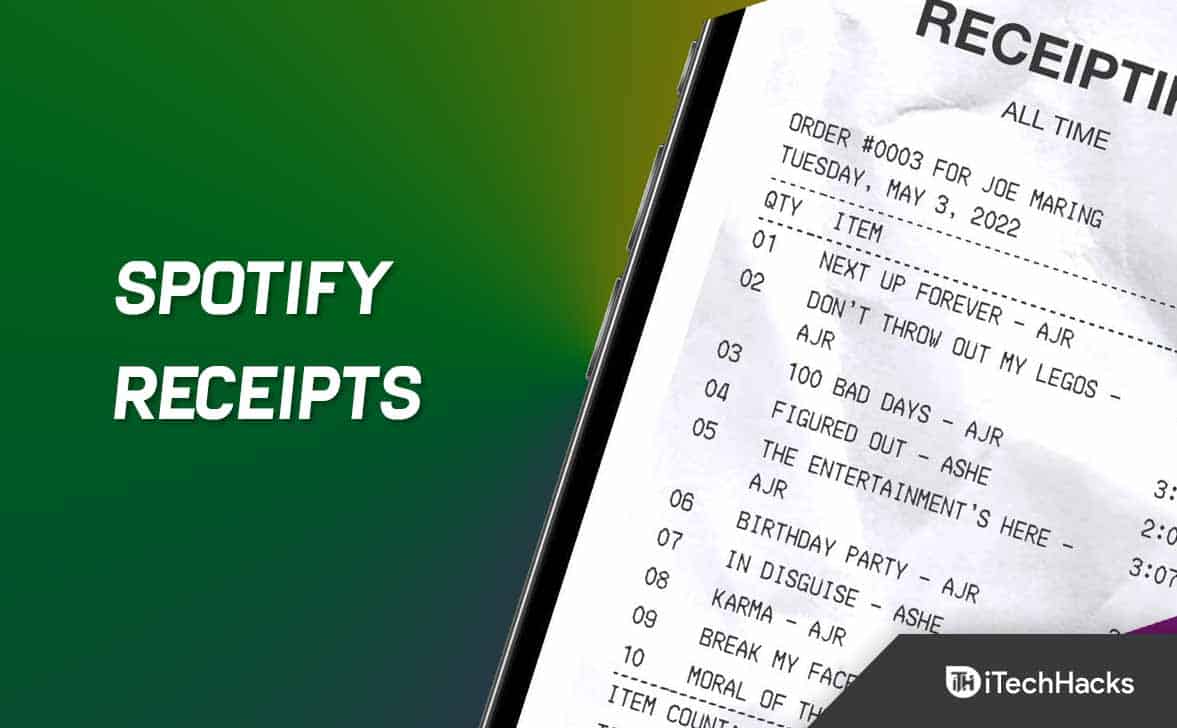
Spotify receipt is a web tool that functions as a “top track generator” by gathering information on the music you’ve been listening to in the past six months. This tool analyses your listening history and produces a sales receipt that showcases your most frequently played tunes, listed in order of play frequency.
As the name suggests, it generates physical receipts that you can share with others on social media platforms. This offers your followers a glimpse into your musical preferences. By linking your account, you can generate a customized, downloadable, and printable receipt that reflects your unique listening habits.
This receipt includes a list of your top ten songs, the names of the artists, timestamps, and even a code to give it an authentic receipt-like appearance. Furthermore, you can find your name and the dates on the receipt to ensure that it is specific to you.
How to Create Spotify Receipt?
To generate receipts for your favorite tunes, simply visit receiptify.herokuapp.com and ensure that your browser allows pop-ups. Once you reach the main screen of the Receiptify website, you will be prompted to log in to your Spotify account. This is to allow the app to access your music listening history.
To move on, you must choose a time frame for your receipt. You can choose to view your top songs from the past month, the previous six months, or all time. Selecting any of these options will generate a unique receipt that showcases the most popular songs on your account during various periods.
By using this feature, you can track the evolution of your music taste over time. If you agree to the app’s terms and conditions, it will take care of the rest for you, including generating a list of your top ten most frequently played songs on your phone.
Once you got your invoice, your personalize Spotify receipt will be sent to you shortly. The receipt will include information about each song, such as its title and the artist, as well as the duration of the song, which can be determine by the amount paid for it as display on the receipt.
Upon completion, a “download picture” option will appear. This allowing you to capture a screenshot of the receipt or download it to your device by clicking the button.
Sharing your receipt on social media platforms like Twitter, Facebook, or Instagram is simple and similar to sharing any other type of content. Your receipt will showcase your top ten songs, the artists’ names, the cost of each song, and a barcode. This gives it the appearance of a genuine receipt.
How Can I Make a Spotify Playlist and Download Songs?
Spotify is a popular online music streaming service that offers access to a vast library of songs. Besides that, if you want to save any of the tracks you listen to, you will need to create a receipt. This guide will provide you with step-by-step instructions on how to do so.
To start, open the app and log in to your account. Next, click on the three lines in the top left corner of the screen to access the menu bar. From the menu, select “Settings” and then “Downloads.”
Once you are in the “Downloads” section, you will see a list of all the songs you have play on Spotify. To save a song, right-click on it and select “Download”. Also, you will then be ask to either save the file to your hard drive or add it to your Spotify profile.
If you choose to save the song to your computer, you can transfer it to your smartphone or any other music player. Alternatively, if you add the song to your profile, it will automatically be added to your playlist and made available for streaming later on.
How to Save a Receipt File
Adding a receipt record to your account is a simple way to keep track of your music consumption. Here’s a step-by-step guide on how to do it:
- Firstly, log in to your Spotify account.
- Secondly, click on the settings gear symbol in the top-right corner of the home screen.
- Under “Account & Settings,” click on “Receipts.”
- Select “Create Receipt” from the drop-down menu. If you do not have a payment method, sign up for Spotify Premium or try the 30-day free trial.
- Fill out the necessary fields and click “Create Receipt.” Your receipt will be generated and sent to the email address you provided.
- Lastly, to return to the regular receipt screen, click the “Close” button. Your receipt file is now available for viewing, printing, or downloading.
How to Remove Spotify Receipt from Your Profile
To remove receipt from your Spotify account, follow these steps:
- First, sign in to your Spotify account.
- Now, from the main menu, click on “Account” and then select “Settings.”
- Scroll down to the bottom of the Settings page and find the “Remove” option next to Receiptify.
- Click on “Remove” to confirm and exit the Settings page.
- Sign out of Spotify and then sign back in again.
- Once you’ve signed back in, click on “Account” from the main screen and select “Settings” again.
- On the new account options page, scroll down to the bottom and click on the “Reactivate” button.
- Finally, to re-add to your account, enter your login information and click on “Activate”.
Conclusion
Through Spotify Receipt it’s incredible to discover that you can transform your Spotify listening activity into a tangible invoice. This platform makes it easy to create a receipt without any fees or subscriptions, so there’s no reason not to give it a try. Read on to find out more about it and how to use it.
Read Also: Kaitlyn Siragusa – Her Marriage, Net Worth And Career Details


Leave a Reply