
")


 a Reliable Indicator for Stock Performance?")


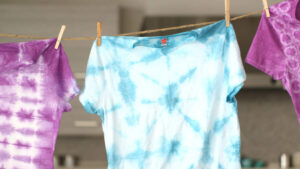
In recent times, tie dye patterns are catching the eyes of the common audience. In fact, we have aways looked to add an attractive twist to our seemingly simple items. In this regard, dyeing is the most popular trend in crafting. Through this pattern you can make your old items look attractive, with a few simple alterations. At the same time, the process is also a simple one. Thus, gather your items and dyes and get ready to set rolling with the tie dye pattern.
However, on thing that you might be confused about is the large variety of patters that are there for this dying system. But, creativity involves experimenting with new and innovative ways. Yet, in order to lessen your confusion a bit, this article will attempt to jot down a few dye patterns that are really attractive and stunning. Moreover, here you will also get the step-by-step guide to make the cool patterns yourself. Therefore, if you are interested to go through some cool tie dye patterns step by step, then this article is the perfect stop for you. Keep reading this article to know everything about some of the coolest ways to upgrade your items through dying.
Guide To Cool Tie Dye Patterns
1. Stripes Tie Dye Pattern
To do this particular pattern, go through the following steps:
- Lay the T-shirt in the flat position on a plain surface.
- From the bottom edge of the t-shirt, fold for a few centimeters. Then use a concertina motion to fold it under.
- Pleat the fabric in such a way that it resembles a long strip.
- Take some elastic bands and tie-up the shirt into various divisions.
- Cover the back and turn the shirt over.
- You can also apply concertina fold to the sleeves for a new look.
2. Spiral Tie Dye Patter
Follow the steps for making this pattern
- Put your t-shirt on a table in a flat manner. Use your thumb and other fingers to pinch the middle of the fabric. Now keep twisting the pinch and create a spiral shape.
- Till you spiral the shirt into a tight ball, do not stop.
- Use elastic bands to tie up the shirt in the spiralled pattern. Use more bands ro create more sections.
3. Polka Dot Tie Dye Pattern
Go through the given steps to make polka dot tie dye pattern:
- This time you need not pinch the middle of the fabric. You can pinch any part and then tie that pinched section using a rubber band. Make multiple such pinched sections.
- Pinching larger fabric and tying further wll result in bigger dots.
- Now sprinkle the dye on both back and front sides.
4. Bulllseye Tie Dye Pattern
To make this pattern, you need to follow these steps:
- Laying the t-shirt flat, this time too you need to pinch the fabric in the middle. Holding the pinch pull-up the fabric in order to gve the rest of the shirt a draping look.
- Make a tube shape out of the draping part.
- A few centimeters under the mid point, wrap a rubber band.
- Add a few more bands at certain intervals.
- Dye each section and cover the shirt in this manner.

5. Crumpled Tie Dye Pattern
This is one of the easy tie dye patterns. Follow the steps to make it:
- You need to scrunch the fabric to make a ball out of it. Then tie elastic bands crisscrossing each other.
- Dye each sectio to cover the entire shirt.
Concluding Lines
These are the five different tie dye patterns that are cool enough. However, there are more patterns that might catch your attention. Therefore, try them out fast.
FAQs
1. How to do tie dye patterns?
You can make tie dye pattern following any of the methods mentioned above.
2. Tie dye patterns how to fold?
Follow the steps mentioned in the article to fold in tie dye patterns.
Also read: Choosing a Right Traditional Hand Knotted Wool Rugs


