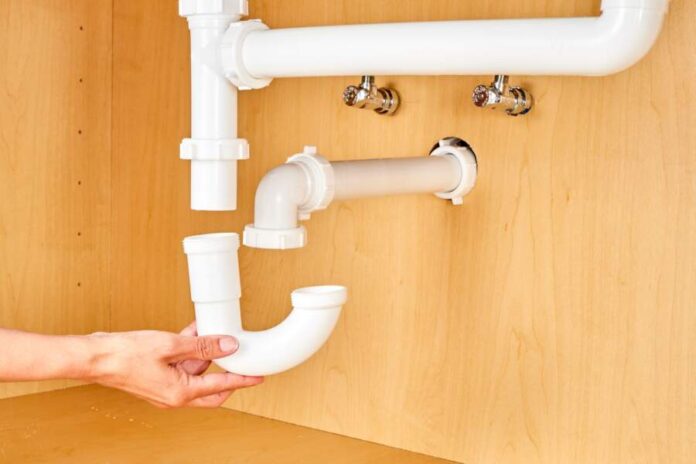
Transitioning from a single sink to a double sink is an excellent way to upgrade your kitchen. This modification conveniently introduces an extra workspace in your kitchen. It also beautifies this space. This article will take you through differences between double-sink bowl plumbing and single-sink plumbing. It will also guide you on how to effectively install a double kitchen sink.
Double Kitchen Sink Plumbing
Whereas a single sink has only a single drain line, a double sink setup has two separate drains. These drains empty into the main drainage waste pipe. This waste pipe sits directly underneath one of the two sink bowls or dead center between the two drains.
According to teamemergencyplumber.com, double sink plumbing is twice the work involved in a single sink. You have to put in a lot of thought and effort with this particular plumbing. If you are not careful, you will have twice as many plumbing issues with the separate drains.
Double kitchen sink plumbing requires the plumber to add a drain assembly to each sink. Then, these different drains have to merge at the drain trap before moving to the waste pipe as a single feed.
Installing Double Kitchen Sinks Plumbing
A basic understanding of plumbing is needed to install the plumbing on double sinks. If you are a complete beginner, do not get intimidated, though. The steps below will help you install your double kitchen sink.
Assemble the Required Tools and Equipment
Assemble the tools and materials needed for the kitchen project. The tools required are screwdrivers, channel locks, a caulking gun, a hacksaw, and a tape measure. The materials include a double sink, sanitary tee, faucet, kitchen drain trap kit, sink drain, strainer assembly, and PVC fittings.
Prep the Sink
Secure the basket strainers onto the bowl sinks drain. Apply an adhesive, such as silicone caulk or regular putty, on the backside of the basket strainer. Place the strainer directly above the drainage hole. The glued side should be facing downwards. Tighten the basket strainer nuts on each sink to permanently affix them to the sink.
Apply enough silicone caulk or plumber’s putty on the sink holes and the countertops before installing the two drop-in-sinks.
With drop-in sinks, always ensure the edges align with the counter. Secure any clips on the bottom side of your countertop to make the sink more stable.
At times, the sink’s edges need to be fasted not on the bottom of the counter, but on the underside of the countertop. To secure the edges of these mounted double sinks, you’ll need adhesive, caulk or plumber’s putty, and heavy-duty clippers. You also need an assistant to hold the equipment as you fasten it with the heavy-duty clips.
Attach the Drain Outlet Pipe
By now, you can probably picture the possible path and size of the drain outlet pipe in your mind. This pipe connects the main waste pipe to the basket strainers on your sink’s underside. For accuracy, however, measure the drain outlet pipe’s length with a tape measure.
The drain outlet pipe suspends at the right height for optimal performance. It should be high enough to allow the P-trap to work. It should be low enough for the drain tailpieces to connect to the sanitary tee fitting and the drain sprout.
Fit the Drain Tailpieces
After adjusting your drain outlet pipe, line it up to match with the tailpiece height. The tailpieces should be at the same height for both bowl sinks. Mark the respective drain tailpiece height using a marker pen. Cut the two tailpieces using a PVC cutter or hacksaw.
Affix the other end of the drain tailpieces to the sink basket strainers. To do so, fasten the adjoining slip nuts using a pair of channel locks. This creates a watertight joint with a secure attachment to the sink.
Connect the Horizontal pipe
Attach the sanitary tee in the middle of your sink. You can also line it up with one of the sinks. If the line runs in the middle, the sanitary tee and drain tailpiece get fitted in a similar configuration. The drain tailpiece gets situated at a 90-degree angle to the fitting. You can then connect the horizontal pipe to the tee fitting in the middle of the sinks.
Your drain tailpieces can also connect to the sanitary tee by aligning with either sink. If that’s the case, the tailpiece first skirts downwards onto the sanitary tee. The drain tailpiece then connects with the tee. This joint is fastened using slip nuts. The tailpiece from the other bowl sink connects to the tee fitting at a 90-degree angle. It’s also fastened using compression nuts.
Repeat the processes to join the drain sprouts to the sanitary tee fitting for the other sink bowl.
Install your P-trap
Once the tee fitting is firmly in place, install the drain tap. This drain trap or P-trap section comprises J-shaped and U-shaped fittings. The sanitary tee first attaches to the U-shaped fitting before connecting to the J-shaped trap on the other end. The free end of the J-shaped fitting, in turn, links up with the drain outlet pipe. Again, use compression nuts to seal these connection joints.
Install the Faucet
The faucet features two lines. One for running cold water. The other for hot water. Both water lines are regulated by a single faucet, however.
Fasten your faucet atop the countertop with its mounted brackets. To do so, use channel locks to secure the compression nuts on its underbelly. This serves to secure the equipment to the counter.
Now, thread the hot and cold-water lines emerging from the bottom to connect to the respective pipes. Tighten these connections using a pair of channel locks.
Inspect the Setup
Finally, once the water lines are firmly secured, turn on the water. Observe how the water flows from your faucets. The flowing water helps to expel any trapped air bubbles in the pipes. After testing the water lines, remember to inspect the drain trap, sanitary fittings, sanitary tee, and basket strainers. Remember to seal the edges using caulk or putty. The adhesives firmly attach the double kitchen sinks to the countertop and prevent leakages.
Read Also: Cooler 101 – When & When Not to Drain Your Ice Chest


