
")


 a Reliable Indicator for Stock Performance?")


In this blog we sharing Complete Guide to Take a Screenshot on a Mac, In case you have been using a Windows PC and have switched to a Mac, you may be thinking about how to take a screenshot without that Print Screen key on your keyboard. Isn’t it? Do not worry, as there is a scope of screenshot techniques — including capturing a particular window or screenshot a webpage – accessible in MacOS, whether you are using Catalina or Mojave, all of which produce pictures you can use for whatever you need.
Updated Guide to Take a Screenshot on a Mac
Using keyboard commands
MacOS keyboard directions are the least demanding and speediest way to take a screenshot on a Mac, whether you are willing to capture the whole screen or only a part of it. By default, all of Apple’s own techniques will save your screenshots to desktop location. If you simply need to copy the screenshot to the clipboard, hold the Control key while you press any of the key blends given underneath.
Capture the whole screen
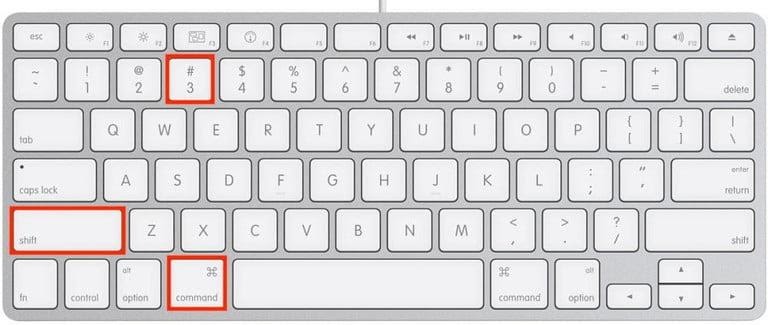
Step 1: Press the Command + Shift + 3 keys all the while.
Step 2: That will save a duplicate of your screen to your work area. You can on the other hand press a similar mix with the Control key so as to save the picture to your clipboard.
In MacOS Catalina, the screenshot preview will show up toward the side of your screen providing a quicker access to editing tools. Also, you can take benefit of “Stacks” feature, that groups together comparative documents on your desktop, for example, screenshot. To do as such, perfectly click on your desktop and hit Use Stacks, and each will be immediately assembled.
“Taking a screenshot on a mac can be a tricky thing do if you are not fully up to speed with Apple products. This easy guide will show you how it is done! “|
Capture the selected region
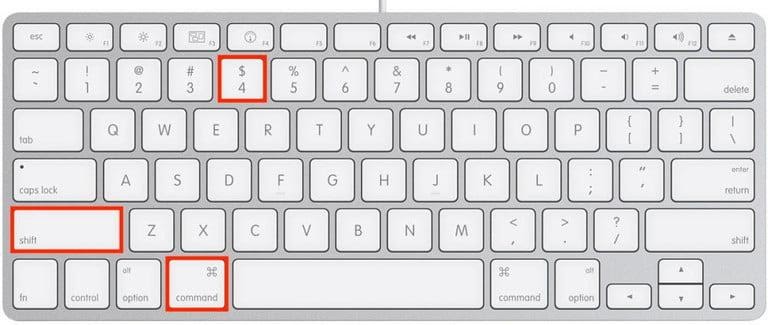
Step 1: Click on the Command + Shift + 4 keys at the same time.
Step 2: With your pointer transformed into a crosshair, click and drag to choose the locale you wish to take snap. At the point when you let go of your mouse button, the screenshot will be automatically saved at your desktop location.
Step 3: Alternatively, in case you are working on MacOS Mojave, press Command + Shift + 5 keys at the same time for an on-screen marquee indicating what will be snapped. This can be moved or resized as per the need and requirement. This combined keys helps you to give a menu with option like whether to display the pointer or not, where to save the screenshot and so on.
Your choice at that point will be saved to desktop. Then hit the Control key to save your screenshot directly to the clipboard.
Note: If the users have a MacBook Pro with Touch Bar, it will give choices on the Touch Bar including the Selected Portion, Entire Screen, or Window. It can also be used to save it to an alternate folder like a Desktop, Clipboard or Document. Another feature related to Touch Bar MacBook is to take a screenshot of the Touch Bar display, which can easily be done by pressing Shift + Command + 6.
Step 1: Hit on the Command + Shift + 4 keys at the same time with a purpose that your pointer turns into a crosshair.
Step 2: After this, click on the Spacebar which will turn the pointer to a camera symbol.
Step 3: Now, you will come to see that the window you float over will presently be featured in blue. This shows this particular window will be captured in your screenshot.
Step 4: In the end, hit on the window you need to capture and a picture of it will be saved to desktop.
The imaged you have saved will be a straightforward in PNG format of the window, alongside its shadow. In case, if the user does not need to include shadow can hit and hold the Option key (marked as Alt on some Mac keyboards) just like we press to save the picture.
In order to save the screenshot to clipboard instead of desktop, add Control to the key combination. However, below is the method to capture screenshot if you are using MacOS Mojave.
Taking screen captures with Grab on MacOS Mojave
Step 1: Bring Grab option from a folder called Utilities which can be found in the Applications folder. Once you open it, you will come to see a symbol for the application in your dock. You can stick this symbol for speedy access later.
Step 2: Either utilize the Capture menu system to capture screenshot as you are willing to or utilize the keyboard alternate ways.
The MacOS Mojave offers you the facility to capture a timed screen snapshot, window, selection, and screen screenshot. In case, if you encounter any issue in relation to taking screenshot on any version of Mac OS, simply take help from professionals available at Mac OS support.
Read Also : How to Login Stream Disney Plus: A Complete Guide to Begin Disney+


