

Planning to sell your iPhone, hand it to a family member, or simply start fresh? Erasing your iPhone properly is one of the most important steps you can take to protect your personal data — including your contacts, photos, bank apps, messages, and passwords.
A quick power-off is not enough. You need to completely erase the device so no one can recover your private information afterward.
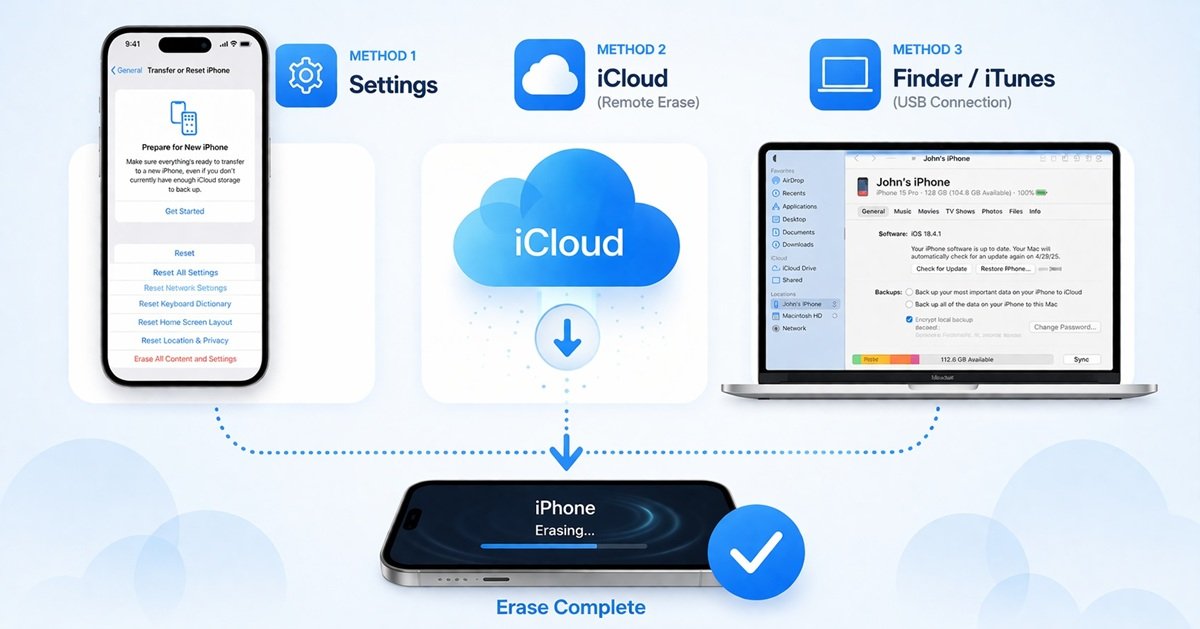
In this guide, we walk you through 3 safe and verified methods to erase your iPhone — using the device’s built-in Settings, Apple’s iCloud, or iTunes/Finder. Each method includes clear, up-to-date step-by-step instructions tested on iOS 16, 17, and 18.
Before You Erase Your iPhone — Do These Steps First
Skipping preparation is the most common mistake. Before erasing, complete this checklist:
- Back up your iPhone to iCloud or your computer (via Finder on Mac / iTunes on Windows)
- Sign out of iCloud: Go to Settings → [Your Name] → Sign Out
- Sign out of iMessage: Settings → Messages → Send & Receive → tap your Apple ID → Sign Out
- Unpair Apple Watch, if connected
- Remove your SIM card if you want to keep it for your new phone
- Disable Find My iPhone (required for some erase methods to work)
|
Quick Navigation
- Method 1: Erase iPhone via Settings (Easiest & Most Common)
- Method 2: Erase iPhone Remotely via iCloud
- Method 3: Erase iPhone via Finder (Mac) or iTunes (Windows PC)
- Factory Reset vs. Complete Wipe — What’s the Difference?
- Frequently Asked Questions (FAQs)
- Conclusion
Method 1: Erase iPhone via Settings (Easiest Method)
This is the simplest and most widely used method. You don’t need a computer or internet connection. It works on iPhone 8 and all later models running iOS 15 or higher.
Best for: Anyone who still has access to their iPhone and knows their passcode.
Steps to Erase iPhone via Settings
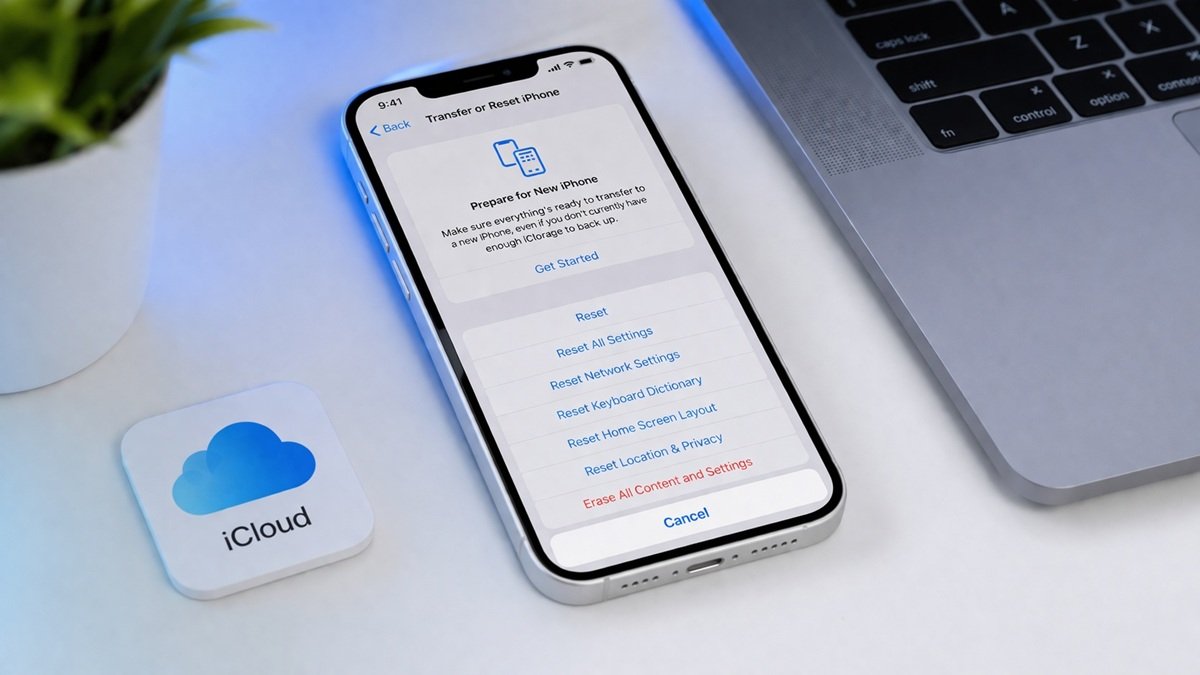
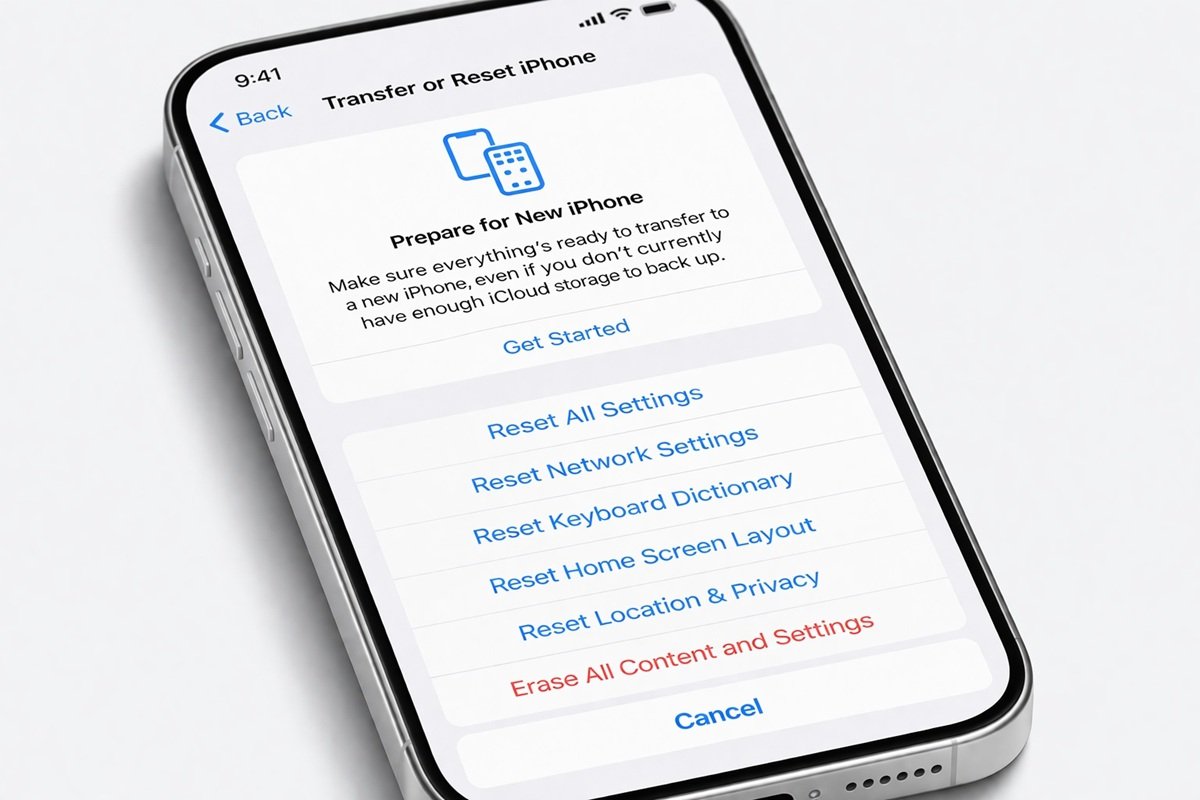
- Open the Settings app on your iPhone.
- Tap General.
- Scroll down and tap Transfer or Reset iPhone.
- Tap Erase All Content and Settings.
- If prompted, enter your iPhone passcode.
- Tap Continue. If you haven’t backed up yet, iOS will offer to back up to iCloud first — recommended.
- Tap Erase iPhone to confirm.
- Enter your Apple ID password to turn off Activation Lock.
- Wait for the process to complete. Your iPhone will restart and display the ‘Hello’ setup screen.
|
Pros & Cons
| ✅ Pros | ❌ Cons |
| No computer or internet required | Requires knowing your passcode |
| Fastest and most straightforward method | Cannot create a backup during the process |
| Works with iOS 15, 16, 17, and 18 | Device must be accessible and powered on |
Method 2: Erase iPhone Remotely via iCloud
Lost your iPhone, or don’t have it with you? You can erase it remotely using iCloud’s Find My feature from any browser or another Apple device.
Best for: Erasing a lost, stolen, or remotely located iPhone.
Requirements
- Find My iPhone must be turned ON before the device was lost or last used
- The iPhone must be connected to the internet (Wi-Fi or mobile data)
- You must know your Apple ID and password
Steps to Erase iPhone via iCloud
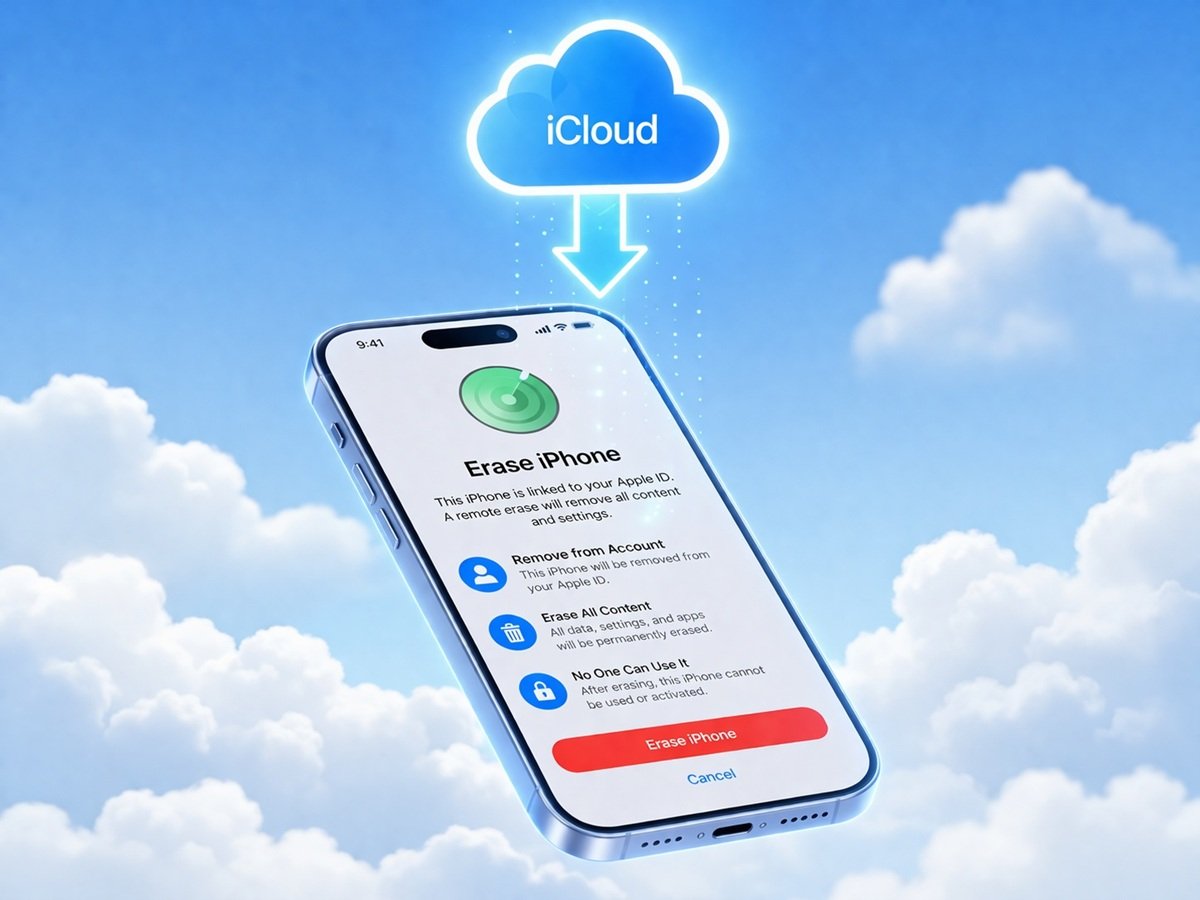
- Open a browser and go to icloud.com. Sign in with your Apple ID.
- Click the grid icon (top right) and select Find My.
- Click All Devices at the top of the map.
- Select your iPhone from the list.
- Click Erase This Device.
- Enter your Apple ID password to confirm.
- Your iPhone will be erased remotely the next time it connects to the internet.
|
Pros & Cons
| ✅ Pros | ❌ Cons |
| Works from any browser, anywhere in the world | Find My iPhone must be enabled beforehand |
| Great for lost or stolen devices | Requires a stable internet connection |
| Protects your data even if device is out of reach | Erase may be delayed if device is offline |
Method 3: Erase iPhone via Finder (Mac) or iTunes (Windows)
This method lets you erase your iPhone using a computer. It also gives you the option to back up your device before erasing — a big advantage if you want to restore your data on a new iPhone.
Best for: Users who want to create a full backup before erasing.
|
For Mac Users — Using Finder (macOS Catalina and Later)
- Connect your iPhone to your Mac using a USB or USB-C cable.
- Open Finder (not iTunes).
- In the left sidebar under Locations, click your iPhone.
- Click Trust if prompted on your iPhone, then enter your passcode.
- Click Back Up Now to create a backup (strongly recommended).
- Once the backup is done, click Restore iPhone.
- Click Restore to confirm. Finder will erase and reinstall iOS.
- Wait for the process to finish. Your iPhone will restart to the Hello screen.
For Windows Users — Using iTunes
- Connect your iPhone to your PC using a USB cable.
- Open iTunes on your Windows computer.
- Click the iPhone icon in the top-left corner.
- Click Back Up Now to back up your device first.
- After the backup is complete, click Restore iPhone.
- Click Restore to confirm. iTunes will erase the device and reinstall iOS.
- Wait for the process to complete. Your iPhone will show the Hello screen.
Pros & Cons
| ✅ Pros | ❌ Cons |
| Option to back up before erasing | Requires a computer and USB cable |
| Restores iOS if software is corrupted | Takes longer than the Settings method |
| Works even if iPhone passcode is forgotten | iTunes not available on Mac (use Finder instead) |
Quick Comparison: Which Method Is Right for You?
| Method | Needs Computer? | Needs Internet? | Can Back Up First? |
| Settings (Built-in) | ❌ No | ❌ No | ❌ No (use iCloud separately) |
| iCloud (Remote) | ❌ No | ✅ Yes | ❌ No |
| Finder / iTunes | ✅ Yes | ❌ No | ✅ Yes |
Factory Reset vs. Complete Wipe — What’s the Difference?
Many people use these terms interchangeably, but they are not the same thing. Here’s what each actually means for your iPhone:
Factory Reset
A factory reset restores your iPhone to its original out-of-box condition. It deletes all your personal data — apps, photos, accounts, and settings — and reinstalls a clean version of iOS. This is what the Erase All Content and Settings option does.
Key point: On modern iPhones (with NAND flash storage and Apple’s Secure Enclave), a factory reset is cryptographically secure. Apple encrypts all data on your device, and the reset destroys the encryption key — making the data unreadable and practically unrecoverable.
Complete Wipe (Third-Party Tools)
A ‘complete wipe’ typically refers to using a third-party software tool that overwrites every storage sector on the device multiple times. This was a necessary step with older hard drive technology.
Key point: On iPhones, a factory reset is already extremely secure thanks to hardware-level encryption. A third-party wipe tool is generally unnecessary for consumer use and may even violate Apple’s terms of service.
| Factory Reset (Built-in) | Third-Party Complete Wipe |
| Built into iOS — no extra tools needed | Requires third-party software (not from Apple) |
| Cryptographically destroys data via Secure Enclave | Overwrites storage sectors multiple times |
| Recommended for selling or giving away iPhone | Rarely needed for modern iPhones |
| Free and takes 5–15 minutes | Paid tools; can take hours |
|
Frequently Asked Questions (FAQs)
Q1. Does erasing my iPhone also delete my iCloud data?
No. Erasing your iPhone only removes local data stored on the device itself. Your iCloud data — including iCloud Photos, iCloud Drive files, and iCloud backups — remains safe in your Apple account. You can access it after signing in on a new device.
Q2. How long does it take to erase an iPhone?
Most iPhones take between 5 and 15 minutes to fully erase. The time can vary depending on the amount of data stored and the iPhone model. During the process, the Apple logo and a progress bar will be visible on the screen.
Q3. Can I erase my iPhone without knowing my passcode?
Yes. If you’ve forgotten your passcode, you can erase your iPhone using Recovery Mode through Finder (Mac) or iTunes (Windows). This will erase the device and allow you to set it up fresh. Note: You will still need your Apple ID to activate the device after erasing due to Activation Lock.
Q4. What happens to my apps after I erase my iPhone?
All apps are removed during the erase process. However, any apps you previously downloaded from the App Store remain linked to your Apple ID and can be re-downloaded for free on your new device.
Q5. Do I need to remove my SIM card before erasing my iPhone?
No, erasing your iPhone does not affect your SIM card. However, if you’re selling or giving away the device, it’s a good practice to remove the SIM card before handing it over.
Q6. Will erasing my iPhone remove it from Find My?
Yes, once you erase your iPhone and sign out of your Apple ID, the device will be removed from your Find My list. The new owner will be able to activate it with their own Apple ID after the erase is complete.
Q7. Can I cancel an iCloud remote erase once started?
If the iPhone is still offline, you can cancel the erase request on iCloud.com before it executes. Once the device connects to the internet and begins erasing, the process cannot be stopped.
Conclusion
Erasing your iPhone is a straightforward process once you know the right steps — and it’s one of the most important things you can do to protect your privacy before passing your device to someone else.
Here’s a quick summary of your options:
- Use Settings → General → Transfer or Reset iPhone if you have access to your device.
- Use iCloud if your iPhone is lost, stolen, or not physically available.
- Use Finder (Mac) or iTunes (Windows) if you want to back up your data before erasing.
On modern iPhones, a factory reset is cryptographically secure — you don’t need any expensive third-party tools. Just make sure to back up your data first, sign out of your Apple ID, and follow the correct steps for your chosen method.
|