


 Vesting: What It Means and Why It Matters")


 a Reliable Indicator for Stock Performance?")


What is your instant thought when you hear the word ‘Fingerboard’? Is it a type of board that is played with fingers? For what purpose is it used?
A professional fingerboard is a skateboard that is “ridden” by copying skateboard tricks with one’s fingertips. The equipment is a little overboard with graphics, trucks, and either plastic or bearing wheels. A fingerboard is typically 100 millimeters long and 26 to 55 millimeters wide.
Fingerboard Bits
A fingerboard is made up of various segments: the deck, trucks, wheels, tape, screws, nuts, and bearings. Plastic or wood is used to make fingerboard decks. Popsicle decks, cruiser decks, and old-school decks are among the shapes available. For the toy industry, trucks are usually mass-produced from metal. Plastic, metal, and resin are used to make wheels. The nuts keep the wheels firmly attached to the trucks. A grip tape made of rubber, neoprene, or fine-grain skateboard grip is bonded to the deck for improved stickiness. The fingerboard trucks contain two bushings that help to smooth out the ride.
Have you Ever Considered Making a Custom Fingerboard?
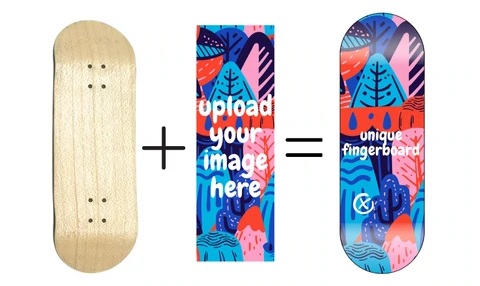
If not, I’ll show you how to customize a fingerboard in a few easy steps. Let’s go over the steps now: –
Wood Veneer Cutting and Preparation
Begin by slicing 5 strips of the veneer you want to use. To give the lamination tremendous strength, each layer’s grain should run at a 90-degree angle to the layer beneath it!
In the Fingerboard Mold: Gluing and Clamping
On four of the five strips, apply a small layer of glue. To make your lamination, stack your strips in the right sequence and sandwich them between two sheets of baking paper in the mold. This will keep the wood from sticking to the mold and allow you to simply remove it later. Clamp the mold in place tightly; using pegs or paper clips to compress any overhanging wood so there are no gaps in your lamination. The ideal method for making these boards is to use fingerboard molds.
Getting Out of the Clamp
Before removing the lamination from the mold, mark where the mold’s edges are on the lamination so you can see where to draw your shape afterward. Remove the baking paper and trace the form of your chosen fingerboard on the lamination. If you have the expertise, you can do this by tracing around an existing board or simply freestyling it.
Designing a Fingerboard
The fun part is shaping, which you can perform with a simple rotary tool, a linisher, or a bench sander. Take your time shaping the board and making numerous passes until the form and dimensions are satisfactory. Using sandpaper, clean up the top and bottom and round off the edges. Working with progressively finer grits of sandpaper, sand the deck’s bottom. Clean the dust off the wood with white spirit before applying the finish to make the grain pop!
Making Screw Holes by Drilling
Make holes in the designated area with a drill. Then, using a bigger drill, countersink the holes. Countersinking is quite crucial, so don’t skip it!
Finishing Touches With Grip Tape
Put your grip tape on. Cut out a rough shape and glue it to the top of the board. A few paper clips were used to keep the grip tape in place and ensure that it is well adhered to the board. Using a craft knife and sandpaper, carefully remove any excess grip tape, and then brush away the dust. To see where the screws will go in, poke a pin through the holes at the bottom of the deck, and apply a finish of your choosing to the board.
Despite the fact that finger boarding started in the United States over 25 years ago, it has become extremely popular in Europe. Because the action can be controlled and the activity can be framed creatively, finger boarding is a wonderful match for videography. Following the techniques outlined above, one can easily make his or her own Custom Fingerboard. All it takes is a little time and patience.
Must Read : Why You Need a Lightweight Electric Scooter


